
There are amazing benefits to including STEAM activities as part of classroom instruction. I was excited to find an opportunity to bring a fun STEAM activity to my entire school of 1000 students for May 4th. Can you guess what I planned? We were making paper circuit lightsabers. Amazing fun! While the event did turn out just fine, let me tell you about the details I struggled with so that maybe my experience will help you in your planning.
Inspiration. I was inspired to do this activity by a couple of sources. First, I received an email from MakerSpace.com. I subscribe to them for ideas, and I love what they send. I saw the idea for the lightsaber paper circuit and was intrigued, but the template included a lilypad button that added extra cost which seemed too high for a whole school activity. Then I attended a Maker Faire at the Science Museum of Virginia. There was a booth set up by WCVE & Science Matters where they were helping visitors make paper circuits – without the button. I knew I could take both ideas and merge them to create a template for all the students at my school. So first tip:
Look for inspiration everywhere and be open when ideas come together.
Timing. Yes, so I waited a little too long to get all the materials. I scheduled this activity at the beginning of the year for May, and I knew (or thought I knew) exactly was I was going to need, so I didn’t believe I needed to order too far in advance. I kept thinking I had plenty of time, plus, I was busy with all the other things I do as an Instructional Technology Coach, I just kept putting it off for later. Then it was later. Second tip:
Get what you need as soon as you know you need it.
Testing. Since I waited so long to get my materials, I, by default, waited too long to test what I purchased. Can you guess where this is going? Nothing worked. I couldn’t understand why! I ordered conductive copper tape, LED diodes, the little coin batteries, and straws to act as the lightsaber blades. I was so excited when my Amazon boxes arrived. I opened them up… Straws – check! Copper foil – check! LEDs – okay, they are smaller than I thought they would be, but that shouldn’t matter – check! Batteries – Woah! These are not 3V batteries. Hmmmm… 1.5V batteries. That shouldn’t matter, right? Wrong! I tried and tried and tried and I couldn’t get the LED to light. So I consulted my Career & Technical Education (CTE) teacher. We could get the LED to light (and burn out) with a 9V battery, but nothing we did would make the 1.5V battery work. We also tried a 3V battery he had in his classroom but still no light. UGH! Third tip:
Leave time to test everything and makes sure it works.
Details. So I kept trying to figure out why the LED wouldn’t light up. I finally went back to my order and read the fine print, meaning I reread the description. And what did I realize? The LEDs I ordered required 3.2-3.4V. So my puny little batteries just weren’t enough to power the LEDs. I was so grateful to Amazon for their quick delivery! I had to find different ones that would work with 1.5V batteries. I decided on Chanzon IR Emitter LED Diode Lights (Clear Round Infrared). These looked perfect because they required only 1.2V. They arrived Saturday, at my house, so I could test the set up again. As I was connecting everything on the template, I was once again excited, but also wary. I felt like it should work, I had LEDs with lower voltage requirements. Alas, still no success. I tried over and over again. Was my battery defective? Was my LED defective? Was my circuit not connecting? I connected the LED to a 9V battery again. Yes, it lit up and of course it burned out. But once again, I could not get the little LED to work with the 1.5V battery. At this point I was getting worried! How was I going to make this work for my entire student body by Wednesday? Was anyone else having trouble with these LEDs? Let me check the Amazon reviews. Ah ha! Well, not in the reviews, but in the questions about the product, “remember you can not see IR , so you wount [sic] know if its correct except with a ir detector..” How could I have missed that detail? These are IR LEDs – infrared light. You can’t see the light, the wavelengths are too long! The only reason the IR LED lit up with the 9V was because the battery was so overpowered for the little diode. So I was going to have to go back to Amazon to find something else! Now I was really cutting it close. I had to place another order. There were not any 1.5V white or clear LEDs that I could find on Amazon. But I did find a set of 1000 LEDs in various colors. Fourth tip:
Ask for help from others who know, it’s always good to have a second set of eyes on things. The nuances, the details, can make or break your project, know what the details are and how they will impact your project.
Resolution. The sets of LEDs arrived on Sunday. And, they still didn’t work with the 1.5V battery. They required 1.8V for some colors and 2.8 for other colors. Did I mention that I planned to provide sessions for teachers on Monday to help them feel more prepared and confident when doing this activity with their classes? I wasn’t feeling prepared or confident yet! So it came to absolutely needing a 3V power source. I could double up the 1.5V batteries and adjust my template. It would make the activity slightly more challenging but still possible. And the cost to order additional batteries would only be about $100. If I had to order additional batteries, I could just order the 3V batteries. Then I would still have batteries to use for other activities now that I had the hang of how all these pieces and parts worked. So that is what I did. I found the 3V batteries for under $2 for a pack of ten. This price worked for me, and so did the activity!
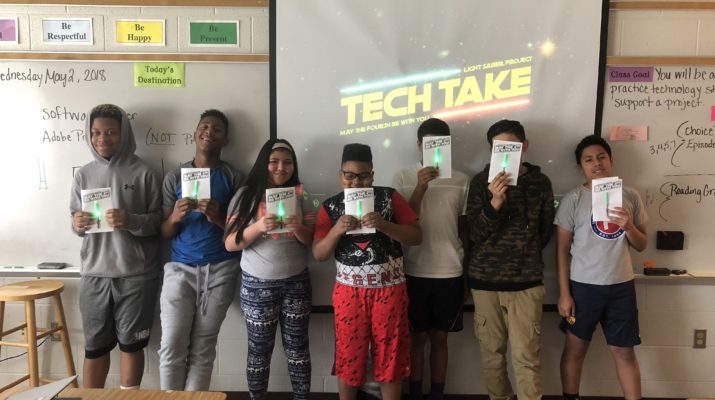
Success. I love it when a plan comes together! The whole school participated in the activity. All students were able to make a lightsaber and take it home with them. I also heard many students and teachers remark on how much fun they had! “This was the most fun in school I’ve ever had!” “This was so cool!”
Hearing how happy the students were doing the making and how successful the project was overall really makes me glad that I went through all the work to make this happen! Helping students find the fun in learning is something that brings me joy!
Materials for your own “May the Fourth Be With You!” Lightsaber Paper Circuit Activity
Authorship Information:
Ann Nash has worked for Henrico County Public Schools since 1998 as both Middle School Science teacher and ITRT. She loves to develop lessons with teachers to inspire a love of learning in students. @amnash